> ## Documentation Index
> Fetch the complete documentation index at: https://docs.social-api.ai/llms.txt
> Use this file to discover all available pages before exploring further.
# Claude
> Connect SocialAPI.AI to Claude on web, desktop, CLI, and mobile.
**MCP Server URL:** `https://api.social-api.ai/mcp`
## Web (claude.ai)
### Prerequisites
* A [SocialAPI.AI](https://social-api.ai) account with at least one connected social account
* Claude Free (1 custom connector), Pro, Max, Team, or Enterprise plan
### 1. Open Connectors
Click your **profile icon**, then go to **Settings** → **Connectors**.
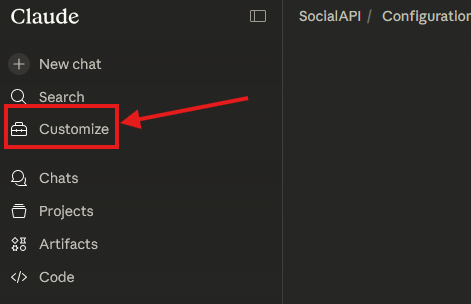 ### 2. Add a custom connector
Scroll to the bottom and click **Add custom connector**.
### 2. Add a custom connector
Scroll to the bottom and click **Add custom connector**.
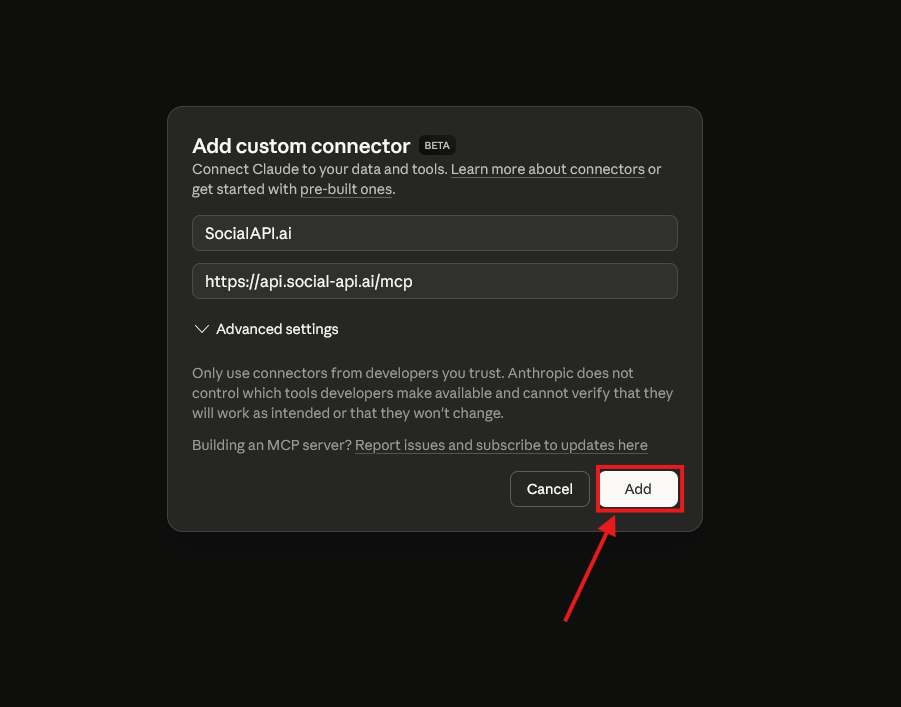
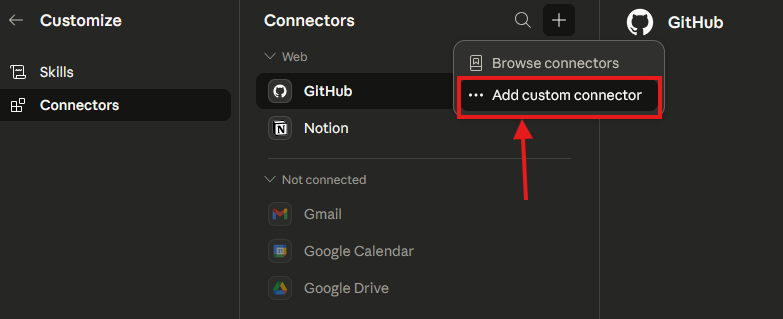 Enter the server name and URL:
```
SocialAPI.ai
```
```
https://api.social-api.ai/mcp
```
Click **Add**.
Enter the server name and URL:
```
SocialAPI.ai
```
```
https://api.social-api.ai/mcp
```
Click **Add**.
 ### 3. Authorize with your account
Claude will initiate an OAuth flow. A browser window will open to the [SocialAPI.AI](https://social-api.ai) authorization page.
### 3. Authorize with your account
Claude will initiate an OAuth flow. A browser window will open to the [SocialAPI.AI](https://social-api.ai) authorization page.
 OAuth authorization screen](https://mintcdn.com/socialapi/dkXBPl2dMHhtYTy4/images/mcp-claude-oauth.png?fit=max&auto=format&n=dkXBPl2dMHhtYTy4&q=85&s=e3d502da0cd17c1632a2ccda01c85335) Log in with your [SocialAPI.AI](https://social-api.ai) credentials and click **Authorize**. The window closes automatically when done.
This uses OAuth 2.1 with PKCE. No API key is required - your session is handled automatically.
### 4. Enable in a conversation
Open a new Claude conversation. Click the **+** icon at the bottom-left of the input, select **Connectors**, and ensure **SocialAPI.AI** is toggled on.
Log in with your [SocialAPI.AI](https://social-api.ai) credentials and click **Authorize**. The window closes automatically when done.
This uses OAuth 2.1 with PKCE. No API key is required - your session is handled automatically.
### 4. Enable in a conversation
Open a new Claude conversation. Click the **+** icon at the bottom-left of the input, select **Connectors**, and ensure **SocialAPI.AI** is toggled on.
 tools to list accounts](https://mintcdn.com/socialapi/dkXBPl2dMHhtYTy4/images/mcp-claude-conversation.png?fit=max&auto=format&n=dkXBPl2dMHhtYTy4&q=85&s=66d8c7c104239deb3583877b8c4e0bab) Try asking:
> "List my connected social accounts"
> "Show me the latest comments on my Instagram posts"
> "Reply to comment sapi\_cmt\_xxx with 'Thanks for your feedback!'"
**Team / Enterprise:** Organization owners add connectors via **Organization settings → Connectors**. Members then go to **Settings → Connectors** and click **Connect** on the connector the owner configured.
***
## Desktop App
### Prerequisites
* Claude Desktop installed ([download](https://claude.ai/download))
* Claude Free (1 custom connector), Pro, Max, Team, or Enterprise plan
### Setup via the app UI (recommended)
Remote MCP servers are added through the app's **Settings → Connectors** - the same flow as claude.ai. Claude Desktop and claude.ai share the same account settings, so a connector added on either one appears on both.
1. Open Claude Desktop
2. Go to **Settings → Connectors**
3. Click **Add custom connector**
4. Enter `SocialAPI.ai` as the name and `https://api.social-api.ai/mcp` as the URL
5. Complete the OAuth authorization in the browser window that opens
Try asking:
> "List my connected social accounts"
> "Show me the latest comments on my Instagram posts"
> "Reply to comment sapi\_cmt\_xxx with 'Thanks for your feedback!'"
**Team / Enterprise:** Organization owners add connectors via **Organization settings → Connectors**. Members then go to **Settings → Connectors** and click **Connect** on the connector the owner configured.
***
## Desktop App
### Prerequisites
* Claude Desktop installed ([download](https://claude.ai/download))
* Claude Free (1 custom connector), Pro, Max, Team, or Enterprise plan
### Setup via the app UI (recommended)
Remote MCP servers are added through the app's **Settings → Connectors** - the same flow as claude.ai. Claude Desktop and claude.ai share the same account settings, so a connector added on either one appears on both.
1. Open Claude Desktop
2. Go to **Settings → Connectors**
3. Click **Add custom connector**
4. Enter `SocialAPI.ai` as the name and `https://api.social-api.ai/mcp` as the URL
5. Complete the OAuth authorization in the browser window that opens
 The `claude_desktop_config.json` file only supports **local stdio servers** (via `command` + `args`). Remote MCP servers cannot be added directly to this file - use Settings → Connectors instead.
**Config file locations** (for local stdio servers only):
* **macOS:** `~/Library/Application Support/Claude/claude_desktop_config.json`
* **Windows:** `%APPDATA%\Claude\claude_desktop_config.json`
***
## Claude Code (CLI)
### Add via command line
```bash theme={null}
claude mcp add socialapi --transport http https://api.social-api.ai/mcp
```
Claude Code will open your browser for OAuth authorization on first use.
### Scopes
By default, the server is added to the **local** scope (current project only). Use `--scope user` for all projects or `--scope project` to share via `.mcp.json`:
```bash theme={null}
claude mcp add socialapi --transport http --scope user https://api.social-api.ai/mcp
```
### Manage servers
```bash theme={null}
claude mcp list # list configured servers
claude mcp remove socialapi # remove a server
```
Claude Code uses its own subscription (Max plan or Claude Code subscription). No separate Pro plan is required.
### Troubleshooting
**Authorization does not open browser** - Ensure your system default browser is configured. On headless/remote systems, Claude Code will print the authorization URL for you to open manually.
***
## Mobile (iOS / Android)
Remote MCP servers work on Claude mobile. You **cannot add new servers from the mobile app** - configure them first on [claude.ai](https://claude.ai) via **Settings → Connectors**, and they automatically become available on mobile.
1. Add [SocialAPI.AI](https://social-api.ai) as a connector on claude.ai (see [Web](#web-claudeai) above)
2. Open the Claude mobile app - the connector is already available
3. Enable it in a conversation via the **+** menu → **Connectors**
Requires Claude Free (1 connector), Pro, Max, Team, or Enterprise plan. Same plan as your web account.
The `claude_desktop_config.json` file only supports **local stdio servers** (via `command` + `args`). Remote MCP servers cannot be added directly to this file - use Settings → Connectors instead.
**Config file locations** (for local stdio servers only):
* **macOS:** `~/Library/Application Support/Claude/claude_desktop_config.json`
* **Windows:** `%APPDATA%\Claude\claude_desktop_config.json`
***
## Claude Code (CLI)
### Add via command line
```bash theme={null}
claude mcp add socialapi --transport http https://api.social-api.ai/mcp
```
Claude Code will open your browser for OAuth authorization on first use.
### Scopes
By default, the server is added to the **local** scope (current project only). Use `--scope user` for all projects or `--scope project` to share via `.mcp.json`:
```bash theme={null}
claude mcp add socialapi --transport http --scope user https://api.social-api.ai/mcp
```
### Manage servers
```bash theme={null}
claude mcp list # list configured servers
claude mcp remove socialapi # remove a server
```
Claude Code uses its own subscription (Max plan or Claude Code subscription). No separate Pro plan is required.
### Troubleshooting
**Authorization does not open browser** - Ensure your system default browser is configured. On headless/remote systems, Claude Code will print the authorization URL for you to open manually.
***
## Mobile (iOS / Android)
Remote MCP servers work on Claude mobile. You **cannot add new servers from the mobile app** - configure them first on [claude.ai](https://claude.ai) via **Settings → Connectors**, and they automatically become available on mobile.
1. Add [SocialAPI.AI](https://social-api.ai) as a connector on claude.ai (see [Web](#web-claudeai) above)
2. Open the Claude mobile app - the connector is already available
3. Enable it in a conversation via the **+** menu → **Connectors**
Requires Claude Free (1 connector), Pro, Max, Team, or Enterprise plan. Same plan as your web account.